Have you ever looked at a photograph and wondered how the photographer captured such perfect brightness, with neither the sky too white nor the shadows too dark? That magic often comes down to a small, but mighty, tool: the exposure meter. But when you start looking, the sheer number of them can be overwhelming. It feels like trying to pick the best flavor of ice cream when there are hundreds of options – where do you even begin?
Choosing the right exposure meter can be a real puzzle. You want to take amazing pictures, but figuring out which meter will give you the best results for your specific needs can feel confusing and frustrating. You might worry about spending money on the wrong one or not getting the quality you expect. This blog post is here to help clear up all that confusion.
By reading on, you’ll learn what makes a good exposure meter tick and discover how to find the perfect one for your photography adventures. We’ll break down the important features and help you understand what really matters, so you can stop guessing and start capturing incredible photos. Let’s dive in and find the exposure meter that will help you shine!
Top Exposure Meter Recommendations

- Exposures accurate down to a tenth-of-a-stop for both ambient and electronic flash light readings in full-stop mode.
- At ISO 100 the ambient EV range is 0 to 19.9 flash f/stops range from f/1.0 to f/90.9 with a shutter-speed span of 60-seconds to 1/8000th-of-a-second (1 sec to 1/500th for flash).
- Photo Mode: for still image photographers featuring shutter or aperture priority display of a full range of ambient and flash functions including cord and cordless flash measurement
- HD Cine Mode: perfect for DSLR and mirrorless videographers who need to take exposure readings and control light using shutter speeds and frame rates
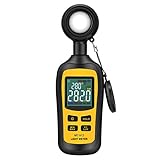
- Measures luminosity from 0 to 200,000 Lux and ambient temperature
- High accuracy of ±3% rdg ± 8 dgts (<10,000 Lux), ±4% rdg ±10 dgts (>10,000 Lux)
- 4 digital color LCD screen, MIN/Max readings, data hold, auto power off, and low battery indication
- Wide range of application, use lux light meter for set design, factory, office or home use

- 【Wide-Angle High-Precision Metering】 Easy-to-use 35-degree wide-angle metering angle with ±0.1EV accuracy, supporting a wide range from ISO1 to ISO3200, shutter speeds from 60s to 1/2000s, and apertures from F1 to F28.
- 【Multiple Shooting Modes】 Offers Aperture Auto mode (A), Shutter Auto mode (S), Manual mode (M), and EV mode (A+S). Supports manual trigger metering (click M) and auto trigger metering (long-press M). Independent X ISO values (such as 1/2/4/6/8/10) can be set beyond the ISO dial scale. Features exposure compensation function.
- 【Independent Dials with Half-Stop Adjustment】Three independent dials for aperture, ISO, and shutter speed, each with tactile and audible feedback. Supports half-stop resolution, adjustable to 1/3 or 2/3 stops. Aperture Auto and Shutter Auto modes can be limited to 1/3-stop or full-stop increments.
- 【Customizable Exposure Indicators】 Over 10 exposure indicators to choose from in Manual mode! Dual LED cardinal point indicators! Customizable to your favorite colors. User manual available at: bit.ly/3DwnoSy
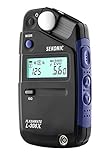
- Pocket-sized and exceptionally accurate tool for metering both ambient and flash lighting as well as working in video with dedicated Cine and HD Cine modes
- Sliding lumisphere able to measure ambient light as well as reflected light via a lens with a 40° reception angle
- Wide metering range; from 0 to 19.9 EV at ISO 100, and can work with flash within a range of f/1.0 to f/90.9 at ISO 100
- Truly universal, the L-308X offers Lux (lx) and foot-candle (fc) readout

- 0.96 Inch Large OLED Screen, 2 types of face. Comprehensive battery life exceeds 20 hours, and it can stand by for more than 6 months when fully charged and turned off. It has a built-in rechargeable battery and can be charged using USB-C cable.And you can increase the screen brightness to increase visibility under the Settings - LCD & Power menu.
- You can switch between aperture priority and shutter priority modes. Single trigger metering mode, automatic trigger metering mode, and average metering mode. It’s 30 degree metering lens can meet the vast majority of usage scenarios.
- Not only does it provide functions such as Exposure Compensation, ND filter compensation, and depth of field calculation, but it also has screen flip display, measurement completion prompt light, and automatic shutdown time setting.
- The cold shoe mounting position can be adjusted according to needs, making it compatible with more film cameras, and .Lightweight and portable, weighing only 26g. You can install the Shutter Release Button Cap of your camera onto the metering button.
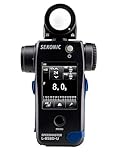
- Specifications: Incident ambient & flash metering, built-in 1∞ spot viewfinder, flash duration measurement including HSS, -5 to 22.9 EV range at ISO 100, optional radio triggering module compatibility, digital precision interface.
- Flash Duration Precision: Measures brief flash bursts and HSS output to evaluate t.1 and t.5 durations, enabling accurate control of motion freezing and high-speed synchronization.
- Integrated 1∞ Spot Metering: Built-in reflected spot viewfinder supports precise highlight and shadow analysis for advanced exposure balancing in complex lighting scenarios.
- Extended Measurement Range: Broad EV range ensures dependable ambient and flash readings in low-light and high-intensity lighting environments.

- Specifications: Analog ambient light meter with battery-free amorphous photocell, incident & reflected capability with interchangeable accessories, swivel head design, full aperture/shutter dial readout, compact durable construction for studio & field use.
- Battery-Free Operation: Integrated amorphous photosensor eliminates the need for batteries, generating power from ambient light to ensure dependable exposure readings anytime in studio or on-location environments.
- Full Dial Readout: Analog calculator dial provides instant display of complete aperture and shutter speed combinations, enabling efficient exposure adjustments without navigating electronic menus or screens.
- Swivel Head Flexibility: Adjustable head design allows precise positioning of the incident dome while maintaining clear view of the display, improving workflow during complex lighting setups and subject positioning.

- 【Wide-Angle High-Precision Metering】 Easy-to-use 35-degree wide-angle metering angle with ±0.1EV accuracy, supporting a wide range from ISO1 to ISO3200, shutter speeds from 60s to 1/2000s, and apertures from F1 to F28.
- 【Multiple Shooting Modes】 Offers Aperture Auto mode (A), Shutter Auto mode (S), Manual mode (M), and EV mode (A+S). Supports manual trigger metering (click M) and auto trigger metering (long-press M). Independent X ISO values (such as 1/2/4/6/8/10) can be set beyond the ISO dial scale. Features exposure compensation function.
- 【Independent Dials with Half-Stop Adjustment】Three independent dials for aperture, ISO, and shutter speed, each with tactile and audible feedback. Supports half-stop resolution, adjustable to 1/3 or 2/3 stops. Aperture Auto and Shutter Auto modes can be limited to 1/3-stop or full-stop increments.
- 【Customizable Exposure Indicators】 Over 10 exposure indicators to choose from in Manual mode! Dual LED cardinal point indicators! Customizable to your favorite colors. User manual available at: bit.ly/3DwnoSy
Your Guide to Choosing the Best Exposure Meter
Taking great photos often comes down to getting the light just right. An exposure meter is a handy tool that helps you do exactly that. It measures the light in a scene so your camera can capture the perfect exposure, making your pictures look bright and clear, not too dark or too washed out. This guide will help you pick the best one for your needs.
Key Features to Look For
When you’re shopping for an exposure meter, keep these important features in mind:
- Type of Meter:
- Incident Meter: This type measures the light falling on your subject. It’s great for getting accurate flesh tones and consistent lighting.
- Reflected Meter: This type measures the light bouncing off your subject. Most cameras have these built-in. Standalone reflected meters are often more precise.
- Readout Display: Look for a clear, easy-to-read screen. Digital displays are common and show you numbers for aperture and shutter speed. Some also have analog needles for a more visual reading.
- ISO Range: The ISO setting on your camera controls how sensitive it is to light. Your meter should cover a wide ISO range to work with different camera settings and lighting conditions.
- Aperture and Shutter Speed Range: The meter needs to measure a broad range of f-stops (aperture) and shutter speeds to be useful in bright sun or dim indoor light.
- Spot Metering Capability: This is for advanced users. A spot meter lets you measure the light from a very small area of your scene. It helps you fine-tune exposure for tricky lighting.
- Memory Function: Some meters can save your readings. This is helpful if you’re shooting a scene with changing light or want to compare different settings.
- Battery Life: A meter that lasts a long time on a single battery is convenient.
Important Materials
Most exposure meters are made from durable plastics. This keeps them lightweight and resistant to everyday bumps. Some higher-end models might use more premium materials for a sturdier feel. The lens or sensor that measures light is usually made of special glass or plastic designed to capture light accurately.
Factors That Improve or Reduce Quality
- Accuracy: The most important thing is how accurately the meter measures light. A good meter will give you consistent readings you can trust.
- Build Quality: A well-built meter feels solid in your hand. It should withstand being carried around in a camera bag. Cheaply made meters might break easily.
- Ease of Use: A meter that’s simple to operate makes your life easier. Confusing buttons or a difficult display can be frustrating.
- Brand Reputation: Some brands are known for making high-quality photography gear. Researching brands can give you an idea of what to expect.
- Calibration: Professional meters are often calibrated to be very precise. For most hobbyists, a good quality meter straight out of the box is sufficient.
User Experience and Use Cases
Using an exposure meter is pretty straightforward. You point the meter at your subject (or the light source), press a button, and it tells you the correct camera settings.
- Beginner Photographers: An incident meter is excellent for learning. It helps you understand how light affects your photos without relying solely on your camera’s meter.
- Portrait Photographers: Getting skin tones right is crucial. Incident meters are your best friend here, ensuring everyone looks natural.
- Landscape Photographers: If you shoot a lot of outdoor scenes, an exposure meter helps you capture the full range of light, from bright skies to dark shadows.
- Studio Photographers: For controlled lighting setups, an accurate meter is essential for consistent results across many shots.
- Filmmakers: Precise exposure is vital for video. Exposure meters help maintain consistent brightness throughout a scene or a whole film.
Choosing the right exposure meter can really boost your photography skills. It’s a tool that empowers you to take control of your camera and create stunning images.
Frequently Asked Questions About Exposure Meters
Q: What is an exposure meter and why do I need one?
A: An exposure meter measures light. It tells your camera what settings to use to take a well-lit picture. You need one to get more accurate and consistent photos, especially in tricky lighting.
Q: What’s the difference between an incident and a reflected meter?
A: An incident meter measures the light that hits your subject. A reflected meter measures the light that bounces off your subject. Incident meters are often more accurate for things like skin tones.
Q: Can I just use the meter in my camera?
A: Yes, most cameras have a built-in meter. However, a separate exposure meter can be more precise and give you more control over your exposure.
Q: Are exposure meters difficult to use?
A: No, they are generally easy to use. You point them at the light and read the settings. Most have simple controls.
Q: What does ISO, Aperture, and Shutter Speed mean for an exposure meter?
A: These are the three main settings that control how much light reaches your camera’s sensor. The meter tells you the right combination of these settings for the light it measures.
Q: Do I need a spot meter?
A: A spot meter is for advanced users. It measures light from a very tiny area. Most beginners don’t need one.
Q: How do I know if an exposure meter is good quality?
A: Look for a meter that gives consistent and accurate readings. Check reviews and see if the brand is known for good photography gear.
Q: Can I use an exposure meter with any camera?
A: Yes, you can use a standalone exposure meter with any camera. It gives you the settings, and you manually set them on your camera.
Q: How often do I need to replace the battery in an exposure meter?
A: It depends on the meter and how often you use it. Many have good battery life and last for many shooting sessions.
Q: Where should I point the exposure meter?
A: For an incident meter, point it towards your camera, at the same angle as your subject. For a reflected meter, point it directly at your subject.
Hi, I’m Mallory Crusta, the heart and mind behind LovelyPetSpot.com.. As a passionate pet enthusiast, I created this space to share my experiences, expertise, and love for all things pets. Whether it’s helpful tips, heartfelt stories, or advice for pet parents, my mission is to make the journey of caring for your furry, feathery, or scaly friends as joyful and fulfilling as possible. Join me in celebrating the incredible bond we share with our animal companions!